Posts

How Do I Update Drivers in Windows For Pc/Laptop Free ?
Image
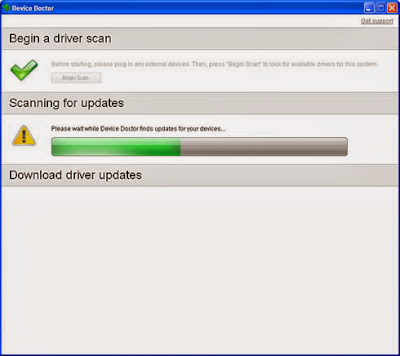
Drivers in your machine need to be updated for better performance of the system.Plus it increases the stability of system There are the various programs to update your drivers.But most are the paid software. Here we have listed free utility program that updates your drivers of  The software is " device doctor " Device Doctor is a  free  Windows application that scans your computer hardware and checks to see if there are new driver updates available for your devices. It also locates drivers for "unidentified devices" in the Windows Device Manager. Just click on 'Begin Scan' to detect your hardware; Device Doctor queries our manufacturer driver database and immediately fetches the  correct driver files  for your computer. Initial Launch When you first start Device Doctor you just have to press  Begin scan  to get started: Scanning for Updates The hardware scan is very quick and completes in seconds: Scan Results After the ...

How to remove toolbars in Google Chrome

Image
If you have accidentally installed any toolbar in your google chrome and if you want to get remove then you can do this in easy steps. Follow this steps to remove any toolbar from google chrome (1) Click on this icon in chrome (2) Then click on setting and then extensions  Here you can see all your extensions installed in chrome in order to remove any click on recycle bin icon (3) in this step you need to confirm that you want to remove this toolbar You are Done !! The good thing about Chrome is that no restart is required after removing Extensions so you can continue browsing immediately.

How to get rid of annoying ask toolbar ?

Image
If you've accidentally installed ask toolbar in  or want to remove one that you don't use anymore, here's how to do it. Many of us don't know that while installing some software, as an additional software ask toolbar get installed in our Browser.   After that when we open our browser it pop-up every time . It also take place in search results instead of Google or others.  we want to remove this but don't know how. So I will explain it to you. How to get rid of this annoying toolbar. In windows Navigate to this Start > Control Panel > Programs and features This is your installed programs . You can find out Ask toolbar easily. Click on Ask Toolbar and Then Click On uninstall . You are Done !!

How to install rainmeter (with screenshots)

Image
To Install Any Theme You need Two Files (1) Rainmeter (2) SkinPack Here is Step By Step Guide (With screenshots) To install Rainmeter. To install Rain meter Follow This Steps : (1) Download Rainmeter  From www.rainmeter.net  It will look lile screenshot Below .  (2) Click on Download Button 3.0 Beta (3) After Downloading Run Setup (4) Click On Standard Installation  (5) Do the same as Screenshot below (6) Finally Click On Install Button.  You are Done.  Now You need Skin/Skinpack/.rmskin/.zip file of your theme.  Download some beautiful Skinpack from below.   Download ironman-SHIELD OS THEME Legacy:Minimalism Evil Windows 7 Theme-Rainmeter Skin Legacy:Minimalism Blue Windows 7 Theme-Rainmeter Skin Prometheus Windows 7 Theme-Rainmeter Skin HALO 4 Windows 7 Theme-Rainmeter Skin Ultimate Batman Customization Windows 7 Theme-Rainmeter Skin Avengers SHIELD-OS-Skin pack Windows 7 ...

Windows 7 VPN setup-With Easy Steps

Image
[Update May-2021: Many Free software and browser extension are now available (Free and paid). It makes the process lot more easier.] This is Manual way for windows 7. If you are interested in that way here it is  Setting up PublicVPN access under Windows 7 is simple. The following instructions go step–by–step through the creation process. Be sure that you run Windows Update before setting up your VPN connection. Open the Start Menu: First, click on the Start Menu and type “VPN” into the search box. Click on the “Set up a virtual private network (VPN) connection.” Enter the server information Now, enter the server information as below. In the text box labelled ‘Internet address’ type ‘gateway.publicvpn.net’. This is the Internet address of the PublicVPN.com servers. In the text box labelled ‘Destination name’ type ‘PublicVPN.com PPTP’. This is the name of the connection, and will show up in the “Connect to a network” screen when we’re done. Lastly,...

Youtube Video Download World Fastest and Easiest way

Image
If You want to download youtube videos and that with out any software then you are at right place. from this Tutorial you can download video directly without installing any software and in short time. This service is provided by en.savefrom.net . Using this you can download video from others websites too .There are three tricks for downloading youtube videos.lets Go in detail of each trick. TRICK 1 (1) You just need to add " SS " (without quotes)before the word " youtube " URL Just Adding SS right before youtube and press enter . " http://www.youtube.com/watch?v=9bZkp7q19f0 "  (Youtube link) To   http://www. ss youtube.com/watch?v=9bZkp7q19f0  (Download page) (2) You will be redirected to page where download link is available for different format and quality.This works for each and every Youtube videos. You can Even Download 3d videos which are on youtube. TRICK 2  (1) First Copy Your Youtube v...

How to Backup and Restore Blogger Template

Image
How To Backup or Download And Restore or Upload Blogger/Blogspot Template in simple way.  Every Blogger should know that how to download and backup Blogger Template and How to Restore and upload Blogger template. Some time we edit our blog template and make some mistake or there's any error or if you do not like the changes in that situation we need our previous template for restore as previous style. Backup or Download Your Blogger Template 1. Sign in to your Blogger account 2. Go to 'Template' 3. On the top right hand corner, select 'Backup / Restore' 4. Select 'Download full template' 5. Choose a location on your computer to save the backup file 6. Select 'Save'. Restore or Upload Your Blogger Template 1. Sign in to your Blogger account  2. Go to 'Template' 3. On the top right hand corner, select 'Backup / Restore' 4. Browse where you have saved the backup file 5. Select 'Uplo...